Help:Character Pages
From Edge of Darkness Wiki
Character Pages
This step comes after submitting your character and it is approved. This might include a probable exchange with the ST's to refine your submission and spend your initial experience points, etc and then, hopefully, your character will be approved for play.
Only once the character has been approved should you advance to these next steps.
Contents |
Creation
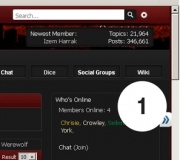
- Logging In: You must be logged in to the main forum via the usual Forum log-in route.
- Click on the Wiki button.
- Do not be alarmed if the images do not exactly match this image - the character avatar images are on a random rotation and the scene titles update frequently too; reflecting current in-character game activity and other active threads.
- On the Wiki page you should see at the left hand side a set of venue menus. Selecting the appropriate venue opens up wider menu options. For this example we'll be creating a Vampire Wiki page. So, to do likewise, click on the menu title at annotation 2 - this opens the wider Vampire menu options and then at select the option as per annotation 3 to open and activate the next page with the fields for adding and editing a new Vampire character.
- Enter the name of your Vampire (or Mage, etc) character into the editable field located at annotation 4 and then click the grey button to the right of the editable field. Doing so takes us to the actual character page for entering in stats, etc and the more detailed Editing. For this example we'll be creating a page for a long forgotten superhero from 1941 - Gloria Travers!
- Please only enter a first and last name or a nickname -- not both. Ex: Bruce Wayne or Batman, not Bruce "Batman" Wayne. Please do not use any special characters such as quotes, etc. This name will be the title of your page. It should also match your character account on the forum.
Editing
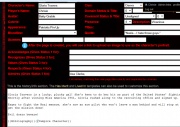
- As we see on this un-annotated page, we've begun to enter in some essential information about Gloria into the pro-forma. Pull down menus help make it easy to complete!
- With characters possessing a higher Presence, it's important to enter a suitable description. It helps build a context for interaction with other players and characters. The same is true for Appearance.
- For Gloria it made sense that she'd be vivacious. She's from the 1940's and was a Forces pin-up.
- Note: Both of these should be 1 or 2 descriptive words, not a full description.
- The Quote box allows for a chance to add in some snappy catchphrase or idiom suitable to your character. It's not mandatory, but it can be both fun and useful.
- The Scene boxes are no longer used. They have been replaced with Tracker and Power Icons.
- The Gives Status area will become important once you're in play. It's where you will outline an expressed opinion on other Vampires within the Domain. The menu has a sort of auto-complete feature and stores a list of character names based on our Wiki fields.
- Asa Clarke is entered in a field here as an example - 'cause, you know... He's the Prince.
- The History area is for expanding on your character (including a full length description of appearance). The Wiki is a place to share information in a way that should hopefully avoid meta-gaming. If you want to share secrets about your character you can do so. But the History area is typically for information that's not freely offered or openly known to other characters in the city. This is an area for players to share with other players.
Avatars
- As you may have seen, there is a list of Avatars currently in use and those permanently retired from use too. Selecting the right Avatar is for many players one of the most crucial steps in character design.
- Betty Grable was selected to represent Gloria and we can add her image to the Wiki page. This image is then automatically updated to a variety of forum areas as a ready reference guide for everyone.
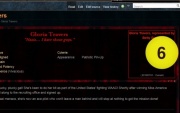
- At the image here, we see the Wiki page without the Avatar image entered.
- Entering the image is straightforward. But first you might want to double check the Avatars list to make sure there's no duplication or retirement! Next, make sure the image you've selected is no larger than 2Mb - the Wiki can only accept images less than 2Mb in size.
- Then, click on the red name - as per located at Annotation 6 on the image to the right...
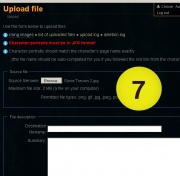
- Clicking on the character name automatically opens a brand new file page for you!
- The next step is just as straightforward. By selecting the box marked 'Browse' (as per Annotation 7) and then selecting the desired file from your computer, the Wiki will automatically supply the name for the file. So the only thing you need to do is select the image via the Browse button and then press Upload at the bottom of the page.
- ...and, hey presto! Your Avatar image is now entered into the Wiki and automatically seeded across other relevant Wiki Pages for you.
- Hopefully, all this should come neatly together and look something like this...
Advanced
There are several templates that can be used to further customize your character page. Instructions are on each of the template's pages.
- Add Character Goodies - For noting particular Merits, prior residencies, etc.
- Template:Haven and Template:Sanctum - For noting shared Havens and Sanctums. Everyone within the same group used on the template will be automatically tallied with the Template:Show Haven or Template:Show Sanctum.
- Help:Quotes - A tutorial to setting up the sub-page for your character to show Quotes and Status.
| ||||||||||||||||||||


